 |
| Hot coffee and crocheted mittens a good combo |
Yesterday I saw a post on one of the Internet crochet sites I belong to of some fabulous fingerless mittens. I have secretly been harbouring an urge to knit a pair after my daughter received a lovely neon knitted set. But my knitting skills are not up to much, so I have been thinking perhaps I should start with something more simple. But salvation came with this pattern in regards to the mittens. Again using just stash busting yarn, I set to. The pattern called for chunky yarn, of which I had none, so I doubled up and used two strands. What do you think?
The pattern is designed by a young Australian called Olivia and her blog is delightful, she has such a fresh and open view of the world. I am her latest subscriber to her blog. If you have not found her yet, I urge you to have a peek here
So to make her mittens, a quick photo journal of my creations, but pop over and see her pattern, link below the photographs.
 |
| Chain 32 and for the second row single stitch from the second loop from the hook till the end of the row. |
 |
| Row five single crochet the whole row, remembering to crochet into the two chains also. |
 |
| Row 6 & 7 single crochet each row. Row 8, creating a second button hole, repeat row 4. |
 |
| Row 9,10,11,12, single crochet, fasten off. Then make a second wrist cuff. |
 |
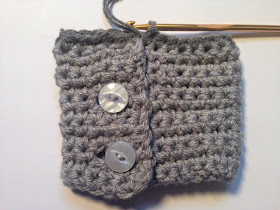
| Sew buttons onto the wrist cuffs. |
 |
| When ready to create the body of the mitten fold over the wrist and crochet both layers together. I overlapped my cuffs with four stitches. Continue round the whole cuff with single crochet. |
 |
| Row 1 of the main body should end up looking as in the above photograph. |
 |
| Row 5 & 6, puff stitch all the way round with one chain space between each. |
 |
| Row 7 & 8 double crochet around the mitten to finish off. Once finished fasten off and weave in all loose threads. Repeat for second mitten. |
Yesterday I made all three pairs of mittens, they are fun and quick and really addictive to make. I shall be making plenty more. Are you tempted? Let me know how you get on and thank you Olivia for such a great pattern.
For Olivia's pattern see here
♥Thank crunchy it is Friday, have a great week end!♥


I am going to give these a go soon.x
ReplyDeleteYou should. Great for dog walking too I suspect. Easy, quick and fun. Let me know how you get on x
DeleteLovely post & Lovely Mitts :0)
ReplyDeleteThank you! They are so comfy too and warm. Very happy to have found this pattern. Will you try making them?
DeleteThey're beautiful. :-) And I can't believe you made them so quickly! I love any sort of glove with buttons at the wrist - they look elegant.
ReplyDeleteThank you. They are fun. PS knowing you like Norway, did you see all the Norweigain posts on the blog?
DeleteGreat pattern and I love the colours you've used. Thanks for sharing this - I'd not seen the a Hopeful Honey blog before but it looks like one I should keep reading!
ReplyDeleteSo glad I think her blog lovely too. I love sharing. Happy you liked. X
DeleteFollowed you back to yur blog - LOVE these fingerless gloves and I've book marked your pattern :-)
ReplyDeleteThey are great and so quick. Let me know when you get round to making them what you think. If you are like me, you have a hundred things anned, could do with more hours in the day!
DeleteAs always, your work is clever and stylish. I love these gloves!
ReplyDelete