• Home
  • About
    • Crochet
    • Knitting
    • Baking
    • Christmas posts
    • Sailing & Travel

      Knitted autumn hat

      28th September

      I maybe in planning mode for the big 'C', shhh, I know it's only September so I thought I better live in the moment and make something autumnal as well.  Although, I think I'm doing ok so far on that front, see  quick autumn gift wrapping and bring autumn colours indoors and for English country side autumnal views see outdoor Oxfordshire


      One of the things I hoped to accomplish this year was to knit more and sporadically I have achieved this.  To spur me on in the latter half of this year, I have just bought myself a gift... new needles from Knit Pro and I love them!!!  I have been using their dpn all year but have now branched out to their circular needles, so it was with this in mind, I began to knit.

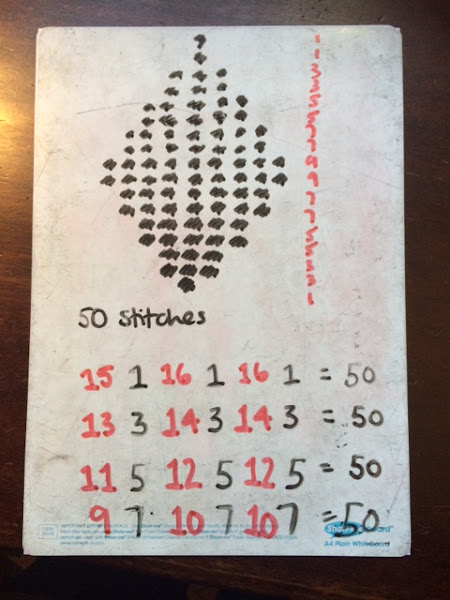
      I decided to make a quick autumn hat with wool from my stash.  Found a lovely orangey red  100% wool from Drops called Eskimo tucked away at the back of the cupboard and used 6mm needles.  Casting on 50 stitches, I set to with no pattern.

      Using wool that I had, I'm trying not to buy any more,
      I began knitting
      I wanted a quick make as really I had not planned for this and so decided to just knit on the circular needles, with such thick wool and large needles I was whizzing along like an old pro, easy to fool yourself, right?  After a few rows I decided it would be fun to try to add some leaves in and almost make the hat pumpkin like.  I set to quickly with my mini white board and white board pens and began to work out how to incorporate some leaves into the pattern.  I love to see how other people plan their designs, so thought I would show you my scruffy planning.  Why a white board, easy to rub out the mistakes as if they were never there!


      Planning the leaf design and the distances
      between the three leaves

      It really was a quick hat to knit, around two hours.  It almost made itself, almost.  I actually had three small balls of green that I used so that each leaf had its own yarn, this meant I was not carrying the yarn round the whole hat.  It worked well mostly, but the yarn threads did tangle up a tad and twice I needed to stop to untangle, but I thought it worth it.

      Growing quickly

      Excuse the no make up look,
      am full of a heavy cold today
      I had not planned when to begin decreasing but waited to see how it sat on my head as I wanted a tight snug fit.  Half way through the leaf design after the nine green leaf stiches I began to decrease one stitch between each leaf for 3 rows and then decreased by 2 stiches between leaves for the remainder of the rows.  Once I was left with only six stitches I cast off, leaving long green tails.  With the green tails I pulled out my crochet hook and chained 10 and then slip stitched into each chain until I was back at the hat.  I then fastened off to create a stem on the top of the hat, a little I hope like a pumpkin stalk.


      We are experiencing beautiful
      autumn days at the moment

      Do you know how difficult it is to photograph
      yourself wearing a hat?  It almost took longer
      than the knitting itself!!!


      I feel that should the weather turn and let's face it, it could any day now,
      that I am ready and will be seasonal myself to boot! 
       
      ♥  Have a great week wherever you are 

Autumnal vases a quick make

26th September 

Today I felt the urge to use the ever growing pile of leaves from the garden.  Those who have followed me for a while will know that I love flowers and that I use all sorts of vessels as vases.  Again today, I use an old favourite.  A cardboard pot!  Come and see...


A quick autumn vase make over


You will need a container, mine is a cardboard vessel,
PVA glue and brush, old drinking glass and autumnal leaves.

The leaves were still a little damp from being outside so I put them in the oven after I had baked a cake, switched the oven off and left the door open.  Just enough to dry them a little without discolouring them.


Leaves drying before use
Smother the vessel of choice in PVA glue, don't be shy, use lots. 
Smear it in evenly before adding leaves.


Add PVA glue, remember it dries clear

Start attaching the leaves, making sure to cover the whole container and in my case not to show any of the blue colour.  I needed to add more glue where the leaves over lapped.  I also decided to leave some of the leaves poking over the top edge, but confess to trimming any that were over the bottom edge.


Leave to dry, in my case this took less than an hour, but will depend on the amount of glue used and the temperature in your home.


I picked some autumnal flowers from the garden ~ dahlias.  Found an old drinking glass that was in actual fact an old nutella jar!  Then added water to the glass, carefully put the glass in the now dried leaf vase and added the dahlias.


One very seasonal vase, bringing the outdoor autumn colours into my home...


An even quicker autumnal vase                   

You may not have access to autumn leaves or perhaps not the inclination to become all gluey, but there is another way to bring the seasons colours into your house.  I mixed red and yellow paint as I did not have any orange and with another cardboard container painted it autumn orange.  I had hoped to get away with just one layer of paint, but whatever the shiny bit is on the outside of the cardboard resisted the paint and so I ended up with three layers of paint.  However each layer dried incredibly quickly and it was all painted, done dusted and dried in just over an hour.   Ready for flowers...

An orange painted vase for autumn


Autumnal vase in situ in my home

You may also be interested in my other vase makeovers


  Happy autumn days to you all  

Autumn in a nutshell

25th September

Autumnal gift wrapping: photo tutorial
I keep contradicting myself, do you ever do that?  One moment I long for the summer, I'm sure my
face has not felt enough vitamin D this year and my well being does not feel summer refreshed as usual.  But on the other hand the autumnal colours coming through, the beginning of crispness in the air and the smell of wood fires excites me to the tips of my toes.  But oh the summer sun, I do miss you...

For me so far autumn is shaping up well and I share with you my five favourites so far, grab a coffee and have a peruse...


A cosy home, when it is dark outside a roaring fire to warm us inside.


Cosy at home, batten down the hatches and snuggle


Food on the table harvesting from the garden, what could be more autumnal than that?


Harvest from the garden in a hand
made wooden bowl by my FIL


Dahlias scream autumn gardens and this year I have beaten the slugs and snails, a small battle won but it has pleased me enormously.


Tomorrow there will be a post about two
types of autumn vases
and very quick makes, pop back and see!


Candles, all my life for as long as I can remember I have loved candles.  The more the better, as I write this I have seven lit candles all around me. Something about warmth and light I suppose, homeliness, snuggling down, safety. 


Never too many candles


Autumnal walks.  Two walks in two days in different areas of our county, both within minutes from my home, very blessed to be surrounded by beauty and autumn days with clear blue skies really are a treat and soar my emotions upwards.  Yesterday I urged you to grab a coffee and walk with my around my neck of the woods, if you missed it, as said, grab a coffee and come and join me, would love it if you did.  Autumnal Oxfordshire


Local churchyard in the autumn sun
Joining in today with Amy  to share with you my five joys of Autumn,
pop over and see what others are sharing.


  Happy autumn to those of you in the northern hemisphere, enjoy spring if you are in the south 


Autumnal Equinox

23rd September

At 0820 GMT the northern hemisphere had it's autumnal equinox and the opposite was true for the southern hemisphere.  What does that mean?  In Latin, the literal translation of equinox means equal night.  So although I have been feeling it for some time the nights are now officially going to be longer than the days and the meteorologists say that we are officially in autumn.  The scientific reasoning in my crude understanding is all to do with the tilt of the earth in relation to the sun. And that today neither south nor north pole are tilted towards the sun, hence we are in an equinox.  From tomorrow, we in the northern hemisphere are titled away from the sun and our nights become longer and the temperature will drop. 

Today therefore I decided to take a stroll through the Oxfordshire countryside and experience this first day of autumn for myself.  There was a slight chill in the air but it was dry and the sun crept out occasionally.  Let me take you for a walk in my neck of the woods...

I prefer the rectangular hay bales but this was a cheery sight today


He popped his out as I approached


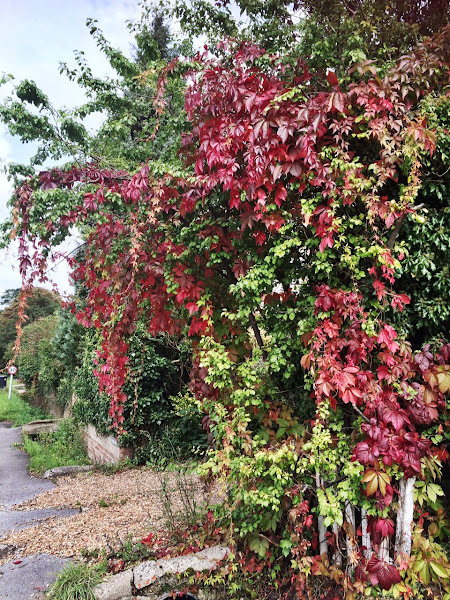
Virginia creeper is changing colour already

Such an autumnal colour

Typically English country signage

Local pub

Oxfordshire's rolling countryside

Still colour to be found

Love some of the architecture to be
found in our villages


  Enjoy the equinox wherever you are in the world  

The personal touch to autumn gift giving

22nd September


I love beautifully wrapped presents and there was a time I spent ages on making sure my gifts looked oh so beautiful.  Then children arrived and I became a harassed and hurried gift wrapper.  But no
more, I feel the need to make my life and gifts that I given once more beautiful and here is where my love of crochet comes in, follow me if you will...


We have lots of birthdays in this season, so I thought it apt to wrap with autumn in mind.

Bowls are always awkward to wrap for me,
so this would be a challenge
Let's make the ribbon and embellishments...


Crochet ribbon
I decided to use just orange and green and keep it seasonal.  To work out the length of crocheted ribbon needed, I kept the bowls close to hand.  I began to chain stitch and when I felt it was about the correct length actually tried it around the bowls to see, I was a bi short so needed to crochet more.  remember that the chain stitch and subsequent ribbon will 'give' a little so better to be a tad short than too long.


Checking the chain ribbon length on the gift itself

Dc around the chain loop


Once happy with the length, slip stich into the first chain to create a loop.

We will now begin to double crochet into each chain.  (I am using UK stitches, so for my American friends this would be single crochet.) 


How to double crochet for beginners ~skip this if familiar
 
Put the yarn over (YO) the hook
 

Place hook into the next stitch

YO hook


Pull the yarn through the stitch, you should now how three loops on your hook


YO hook


Pull the yarn through two of the loops on the hook, leaving you now with two remaining loops on the hook


Again YO hook


Finally pull the yarn through the last two remaining loops, leaving you with just one loop

This is a completed UK double crochet
This needs to be done into each chain of the loop.
Once you have reached the end slip stitch into the first chain to complete the ribbon and fasten off.


To adorn the ribbon, I used a simple increase decrease leaf...
 
 
Chain 12


Into the second chain from the hook slip stich then into each next stitch complete the following:
sc
hdc
dc
tr
dtr
tr
dc
hdc
sc
and finally at the end of the chain slip stich.  this completes one side of the leaf and you should be able to see a very obvious increase and decrease on the side you have crocheted on.
 

One completed increase decrease side of leaf
Working along the opposite side the process needs to be repeated.  Stitch definition is not always so clear on this side, just try to find a space to crochet into, trust your judgement, it should work fine.  So again...

sc
hdc
dc
tr
dtr
tr
dc
hdc

and  finally slip stitch.  To create the stem of the leaf, chain four.  then slip stich into each stitch back up towards he leaf itself.  Pull yarn through and  fasten off.  You have one autumn leaf.


I fancy making lots of shades of red and browns now


Gift wrapping option 2

An even quicker ribbon for a smaller gift could even be as simple as chain stitch, it is rather effective, I think.

For this, I chained again all the way round the box and when I met the other end, just slip stitched into the first chain.  This was the bottom side of the box and  completed one whole wrap around the box.  To add ribbon on the other side of the box, I just continued to chain whilst the box was already crocheted wrapped, does that make sense?  See below photograph for clarification...


Continuing along the other side of
the box with chain stitch

I continued to chain until I met the perpendicular chain ribbon on the top side of the box and to secure it in place so it would not slip off slip stitched here at the cross junction.
Meeting up on the top side of the box


At the cross junction, slip stitch to hold it all in place

On arriving back on the bottom of the box,
again slip stitch and fasten off.

Now I think the box looked good as it was, but decided to make some little acorns to embellish it. However, this is perhaps not for the beginner, but the box can be embellished with all sorts from hearts, flowers, sail boats or bought little trinkets even.  

Autumnal gift wrapping
To make an acorn:

Colour A: green
Colour B: orange

With colour A:  Leaving a very long tail, (we will be using this to make the stem later) Chain 5 and slip stich into the first chain to make a loop.

Chain one.  Into the loop dc x7 Close the round by slip stich into the chain one.

Chain one
Into next stich dc x2, then next stich dc, continue till the end of the round. Slip stich onto chain one.

The crochet should want to curl up a little into a tiny cup shape, let it.

Chain one.  Dc into each stitch. Slip stich onto first chain one.


The cup of the acorn

This is the fiddly part...

Using colour B

Hold the acorn cup with its bottom facing you and the opening away from you.  We are going to be crocheting in the round in the opposite direction to how the cup was crocheted.  I know, this sounds bonkers and you may have to read this sentence a couple of times, but if you have the cup bottom close to you we will be working on the outer edge facing you.  Working into the BACK LOOPS ONLY.  See below photographs.

This photograph is to show you that each stich
has two loops.  for the acorn itself we will
be only going into the back loop only. 
In this picture that is the loop closest to
the hook and in the middle of the acorn cup.

Going into the BACK LOOP ONLY
 So lets start, using colour B, insert hook into the back loop and chain four.

♥ Into the next stitch tr crochet, but do not pull through the last two loops, keep them on the hook as we are decreasing.
Into the next stich tr crochet and as before do not pull through last two loop, keep them on your hook.  I know it's getting crowded but stick with it.
Finally in the third stitch tr crochet and on the last pull through pull yarn through all remaining loops.  ♥

We have now decreased and you should look like the below photograph.

Repeat between ♥ twice more. 

You should then have completed all the way around the cup.  Slip stich into the top and fasten off.

 
Then is a treble crochet decrease
 Making the stem.
Hopefully you did leave a long tail as requested.  Put your hook into the bottom of the cup as in the below photograph and pull the tail through to allow you to begin to chain stitch.


Chain 10.
Into second chain from the hook, slip stich and slip stich in each chain until you reach the cup.  Fasten and neaten off.

One completed acorn ready for sewing onto your crocheted ribbon.


Acorns as adornments


♥  Hope you are surrounded by gifts
both in giving and receiving