Showing posts with label Scandinavian christmas. Show all posts

Gløgg toppers

It's the season of gløgg (mulled wine) and pepperkake (Scandinavian spiced biacuits). Both often drunk and eaten together. Normally house visit after house visit by the end kf the winter most Norwegians are ready to call it a day on bith these foodie delights.  It's a bit like putting the decorwaway after Christmas, you loved having them out but its time to have a minimalist feel back in the home. That sais we are still goimg strong in the wintwr season so why am I blabbering on about having too much of a good thing. 

I decided it woukd be lovely to combine the too in a slightly different way and to create a gløgg topper.  Im nit thr fitst to think of this, it is a bit akin to how tapas began, putting thefood as a lid on red wine to combat the flies.  Well we dont have flies as its not hot but its a fun way to present a cookie.

 
Gløgg cookie topper

Glogg cookie toppers

You will need:
310g plain flour
1/2 tsp salt
180g butter, softened
200g sugar
2 eggs
1 tsp vanilla extract

♥  Sift the flour and salt into a large bowl.
♥  In a separate bowl cream the butter and sugar until pale and fluffy.
♥  Add the eggs one at a time, continuing to mix.  
♥  Stir in the vanilla extract.
♥  Add the flour to the mixture and mix until the dough comes together.  It is really important not to over mix as the cookies will be tough.  So stop mixing as soon as the dough comes together.
♥  Divide the dough into two equal parts and chill in the fridge for a minimum of an hour.
♥  Preheat the oven to 200 degrees Celcius and line a couple of baking sheets with greaseproof paper.
♥  Roll out one of the dough balls onto icing floured worktop, into as close as you can get to a rectangle about 5-6  mm thick.  Then cut out long strips about 5 mm wide.  I used a pizza wheel to cut the strips.

Use a pizza cutter for speed and straight(ish) lines


♥  Layout half the strips in a vertical direction with a couple of mm gap between each piece.
♥  Fold over carefully every other strip, so that the strip is folded down over itself when folding be careful not to crack the dough.  See photo for clarification., folder over strips are B. 

Fold over alternate vertical strips
each time you place a horizontal strip

♥  Next, take another strip and lay it horizontally (see photo and the green hand-drawn strip) into the empty space, so that it lays on top of the remaining vertical strips.  Flip back the folded strips so that they now lay over the horizontal strip.
♥  Now fold over the remaining strips, shown as A in the photograph, and lay the next horizontal strip down.  Repeat this process until you have used all your strips.
♥  Very gentle roll over the lattice formed strips to help them adhere to each other, but do not press too hard.
♥  Take the cup or glass that you will use for serving your gløgg in and use it as a cookie-cutter. See photograph.  Please each cut out gløgg topper onto the lined baking sheets.  These should not swell on baking so can be placed fairly closely next to each other.
♥  repeat with the second dough ball or leave in the fridge for another time, will keep for a few days.

Use the cup or glass you are going
to serve your gløin as a cutter


Gently tease the pastry out from the cup
and place on the lined baking sheet

You can place the gløgg toppers quite
closely together on the baking sheet


♥  Bake for about 6-8 minutes or until golden brown.

Bake till golden brown


♥  Cool on the baking sheets, do not remove to a wire rack.
♥  These gløgg toppers should hold in an airtight tie for about a week or could be frozen for about a month, remembering to thaw completely before serving.
Just as you are serving your drinks pop a gløgg topper over the warmed gløgg.
♥  The gløgg toppers should not be over the gløgg glass for too long or they will become soft and soggy!

Skål! as they say in Norway


A festive tray of gløgg, gløgg toppers and Norwegian
Brent mangler ( burnt almond) more on this tomorrow 


Hope you are all feeling the festive cheer 


❤️What are your festive plans this weekend?❤️


Farmer Biscuits

The Scandinavians bake or at least used to, from we think the 1800's onwards “syv slag”, meaning seven
Bondekjeks ~ Farmer biscuits

sorts of cookies for the Christmas period.  We do not really know why seven or indeed exactly how it came about.  One theory is to do with coffee houses that sprung up in the late 1700s and the cookies they offered to accompany the coffee. This then they believe filtered through to ladies visiting each other in their homes and being offered something alongside the coffee.  A housewife was thought of as mean and stingy if she offered fewer than seven cookies and showing off if she offered more!  You just cannot win, can you!
That said in today's world many no longer bake seven varieties, after all, who has the time?  Although for me it has become a part of the lead up to Christmas and something I find comforting and warming to do and has become important to me so I will continue. 

The cookies I have chosen to showcase today has a very unpretentious name, that of Famer's Biscuit.  It originated in Sweden and was apparently presented to the King of Sweden many many years ago as being one of the most unassuming sounding biscuits but one that surprisingly packs a real punch and hits all the right notes of a biscuit.  It has almonds which add the all-important crunch to a good biscuit and golden syrup that adds a hint of caramel but allows the biscuit to also be a little chewy.  A truly winning combination.

I really urge you to give these a go, they are soooooo moorish. To ensure the best bake, the dough needs chilling for a minimum of an hour.


Bondekjeks ~ Farmer Biscuits ~ Vanilla almond cookies 


❤️  You will need:
190g softened butter
150g sugar
1-2 tbsp golden syrup, depending on taste
1/2 tsp vanilla extract
1/4 tsp almond extract 
250g plain flour
150g chopped almonds (keep the chunks on the larger side)
1 tsp baking soda
1/4 tsp salt

❤️  Mix together the butter and sugar until light.
Add the golden syrup, vanilla and almond extract.  Stir thoroughly.
Add flour, baking soda and salt.  This will form a crumbly dough but do not worry.

❤️  Roll the dough into small sausage-shaped logs, making the diameter the size of the desired cookies.  I tend to roll mine out to somewhere between 4-6cm.  With this mixture being a bit crumbly, I find if I roll the sausage log too long the middle becomes hollow.  Therefore, I make about 6 small logs from this dough.  See photograph.
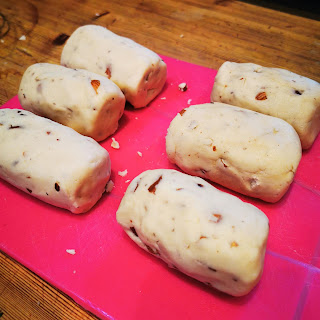
Six logs from the cookie dough,
notice that there are crumbs on the board
indicating this is a crumbly dough


❤️  Cover the dough logs in cling film or an airtight container and place in the fridge for an hour or preferably overnight.

❤️  Preheat the oven to 180 degrees Celsius.
Take out the number of logs desired, this mixture will keep in an airtight container for about a week.
Slice the log in to about half centimetre slices and place on a lined baking sheet.  If you have rolled the same number of logs as I have (6) then I can get about 6-7 slices from each log. The cookies will spread a little so leave enough room between cookies on the baking sheet.  See photograph.

I mark out how many biscuits
I can slice before I cut.

❤️  Bake for 8-10 minutes or until slightly coloured. Cool and eat.

❤️  These cookies will store for a few days if kept in an airtight container.

I like this recipe as I keep a few logs in the fridge and just slice them up and pop them in the oven if an
unexpected visitor arrives, lovely newly baked cookies made to order!  Although here in the UK that is not likely to happen this December, but still who doesn’t like a freshly baked cookie? Perhaps this year we will have to just eat them ourselves or better still make a few local socially distanced deliveries to friends in the neighbourhood who we would otherwise have been spending an hour or two with over cookies and coffee.

Bake a few Bondekjeks (Farmer biscuits) you won't regret it


❤️  VARIATION: I know many cannot eat nuts so a good variation of this is to omit the almond extract altogether and replace the chopped almonds for dried cranberries.  This makes then for a very Christmas type taste along with the vanilla of these cookies.  

❤️  NOTE: You could freeze the dough logs if you wanted to make them ahead, just remember to allow to defrost thoroughly beforehand and then ensure they are chilled before slicing and baking.

So far we have baked two of the seven types of cookies for Christmas...

Bondekjeks to the left and pepperkake on the right


  Will you be baking any cookies in December? 

Christmas birds

December 21st

Scrap yarn bird
As a child, we had a few homemade decorations on the Christmas tree, one being a bird made out of
yarn, that mamma had made when she was a child.  She said they had several on their tree and it, along with an angel she made as a little girl, were precious decorations.  Over the years, the bird has disappeared and I was only reminded of it this year when an online tutorial was brought to my attention.  Link to it is at the bottom of this post.  I knew having seen the tutorial that I needed to make a Christmas robin and bring back some of my childhood memories.

These are great quick projects to make in company with adults or children and if I had more time, I know I would have made lots for the tree this year. Got a spare half an hour, then you too could make one of these...

Full tutorial on the link at the end, here are just my photos to give you an idea how to make a scrap yarn bird.


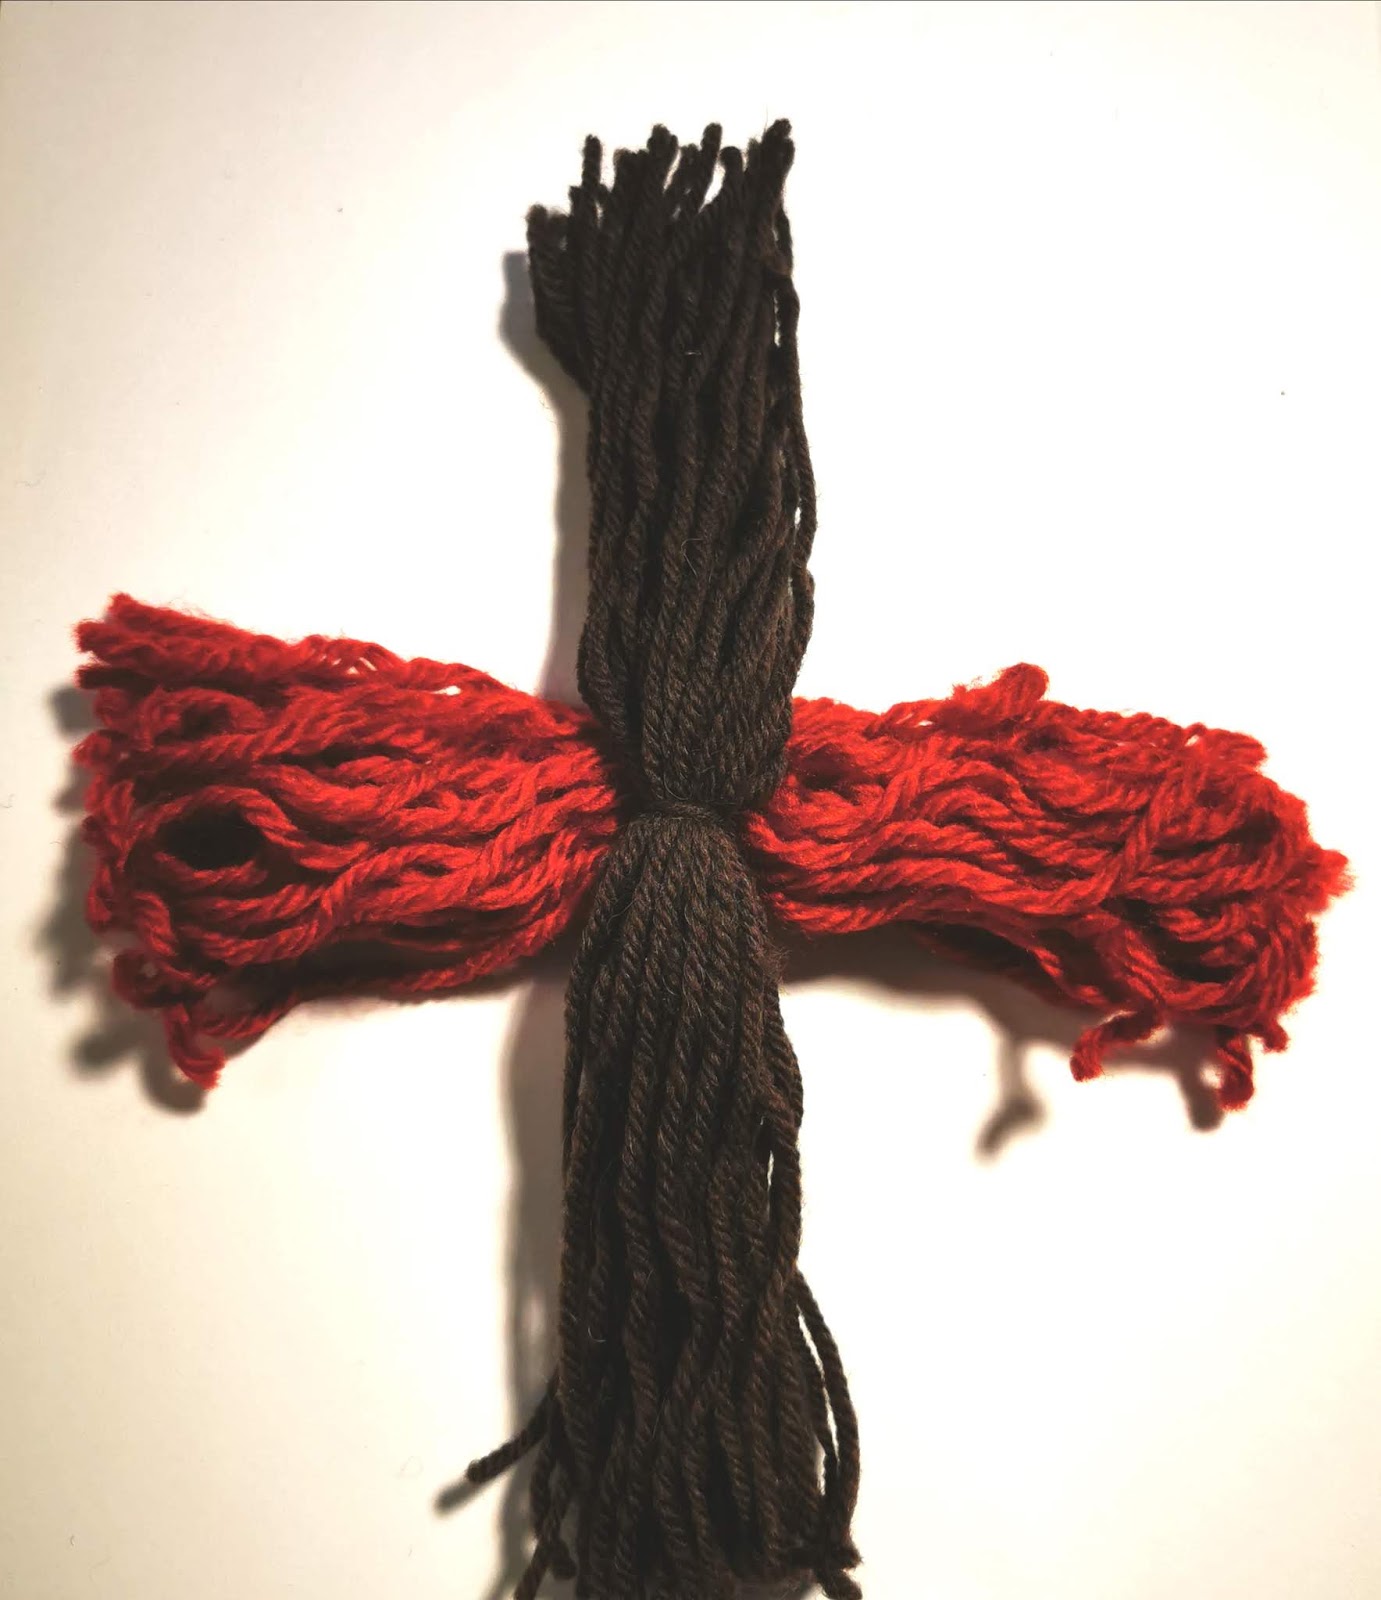
Cut out two pieces of card

Wrap yarn around until you have at least 1cm width of yarn in each colour

Cut just one end, hold tight, so the yarn
does not fall all over the place


Tie each one in the centre

Place the 12cm yarn on top of the 10cm breast coloured yarn

Fold each on half

Take a small new piece of matching yarn for each colour

Tie each as close to the centre as possible

Lay the final colour on top


Scrunch up half an A4 sheet,
his will be the bulk of the bird's body.

Bring together all the loose ends of each
colour section to cover the scrunched paper

Tie tightly  and trim the ends neatly

Make a beak out card

Add some black beads for eyes

Enjoy your bird

As our tree is not yet up, I have added
the robin to the centre of the door wreath

Lovely homemade addition to the wreath

I am sure if we were to make lots of these each one would look different and have their own characters.  Maybe I may suggest to the troops over Christmas that we each make one to put on the tree and give them their own names too!


 For the full tutorial:  Birds


  Hope you have a productive weekend 


Christmas Stars

December 20th
Red spells Christmas to me
but then I am traditional. 
These yarn stars would look
fabulous in any colour


I'm a sucker for a quick make and result and especially if I have the material already in the house. And I'm a sucker too for online video tutorials both for inspiration and ideas and quick self-teaching techniques.  Have you ever learnt from watching a youtube video?  It is true you often have to sift through several truly badly filmed and complicated rubbish to land on 'the one' that will help you but I still find it a worthwhile exercise.  And this is how I landed upon today's Christmas make.  These stars would make excellent crafting sessions with children and I plan on roping in both the small ones and the teenagers over the Christmas holidays to make an entire constellation. 


The link at the bottom of this post  includes a free template
or this star, I transferred it onto the back of an old do not bend envelope

The video shows you how to attach beads to the points
but as I only had pom pom ribbon, I used that instead


Tape the beginning of your yarn onto the centre of the star


Begin winding the yarn around the base of two of the points of the star


Once you have wound up to where the two points separate
move across to the next two, do not cut the yarn just continue winding


Continue winding each section, on the back, there will be a bit of
crisscrossing and not quite so nat at this stage, but that can be sorted at the end

When all base star point s are covered in yarn, I began to wind up
the star point to the tip and then back down again towards the body
of the star, thus creating a very padded a full star.


As you near the end of covering the entire star in yarn, try to be a bit
more careful with the back of it and wind it so that both sides
look as neat as possible.  Hang up and admire!


It's beginning to look a lot like Christmas is just around the corner in our home

Video tutorial and star template can be found here:   Christmas Stars


  Have you made any decorations for Christmas? 

Spelt Crisp bread

December 19th

Spelt Crispbread
In Scandinavia, crispbread is hugely popular at breakfast time or elevenses and even on cross country ski trips as a 'niste' (picnic/packed lunch).  The Danes were very good at importing this as their tradition but you find it all over Scandinavia.  It is wonderfully healthy, very tasty and does make for a great alternative breakfast or when visitors pop by (it keeps for about a week if kept in an airtight box), just throw on some savoury toppings.  Here is my version, hope you like it!


Spelt Crispbread

Melt the butter before adding
ingredients
for the spelt crispbread
You will need:

100g butter
75g rolled oats
75g rye flakes or Special K
25g sesame seeds
1/2 tbsp honey
150g stoneground spelt flour
1/2 tsp salt
1 tsp baking powder
100ml (or thereabouts, plus or minus a few ml) of boiling water


Topping:
Dough before flattening into
the spelt flour crispbread
1 tbsp linseed
1tbsp sesame seeds


  Melt the butter slowly.

  Remove from heat and add in the oats, flakes, sesame seeds and honey.  Mix well.

  Stir in the flour, salt and baking powder and add in the boiling water.  The consistency should just hold together, do not make it too sticky, so add the water a little at a time.  Make sure everything is well-mixed together.
Spelt flour crispbread after flattening

♥  Turn out the dough onto a lined baking sheet.

  Initially, using hands wet with cold water spread the dough as thinly as possible on the baking tray.

  If the spread is not thin enough, I tend to wet a wooden rolling pin with cold water and roll the mixture to ensure it is a bit thinner.  Be careful as the mixture if you re-roll without water will stick to the rolling pin!

  Bake in a cool oven of 150 Degrees Celcius for 30-35 minutes or until it has changed to a slight golden brown colour.

Cut bite-size pieces once the
spelt flour crispbread has cooled
  Cool on the baking tray as moving it at this stage will definitely result in crumbles everywhere.

  Once cooled, using a sharp knife, cut out strips the size of the crispbread you desire.  I like to cut
them into large bite sizes.  I also like to incorporate the rough edges to make it look more homemade.


Spelt flour crispbread ready for their toppings,
what would you choose to add?

A great elevenses snack spelt flour crispbread


Elevenses: Spelt flour crispbread with savoury toppings followed by some of the Norwegian Christmas bakes.


    Hope you have time to enjoy yourself and not be too busy to slow down and take some 'me' time out of your day