11th December
 |
| Crocheted nisse |
Back at the end of October I began thinking about the blog and the posts that I wanted to put 'out there' during December. I quickly realised that lots of my traditional customs and that which we do in our home was eagerly and enthusiastically thrown out into the web ether last December. Not wanting to regurgitate the same old, it dawned on me that I may actually have to give the Christmas month some serious thought during early Autumn.
My go to craft of the last couple of years has been crochet and it was here I began tinkering with Christmas patterns. I am not a designer nor am I a pattern writer but I wanted to make something that was all mine. It's hard. Very hard. And I cannot say with hand on heart that I have truly managed it. I goggled, I searched, I flicked through magazines and books and I pondered. In the end I returned to our family favourite knitted nisse (see post
here ) as my inspiration for a Selma designed crochet pattern: I crocheted hanging nisse for our home.
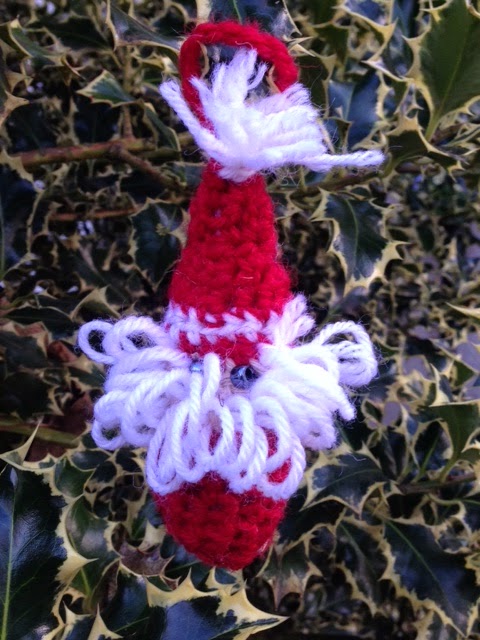 |
| Perfect, nisse in the holly bush |
 |
| These nisse get everywhere, outside to greet visitors |
Crocheted Nisse
 |
| Basic nisse without finishing touches |
For those that do not know, nisse are quite naughty and so I wanted them to not look 'perfect' but to have a little cheekiness to them, I hope that has been achieved.
To make the basic crocheted nisse:
With red yarn, we are beginning at the bottom of the nisse
Row 1: Magic circle and ch 2, then 6dc into the ring and ss to join
Row 2: ch 2 and dc into same stitch. 2dc in each stitch, ss to join - 12 stitches total
Row 3: ch 2 and dc into same stitch. 1 dc in each stitch and ss to join
Row 4 & 5: same as row 3
Row 6: ch 2 and then 1 dc into each of the next 4 stitches.
On last stitch switch to flesh colour yarn and introducing it on the last pull through this final dc stitch.
Continue with flesh colour and 1 dc into the next 5 stitches.
On the last dc change colour back to red on the final pull through. 1 dc in red for the next 4 stitches ss to join
Below are just sample crochet swatches not the nisse, to show how to change colour
 |
Begin dc as normal, pulling through loop
for the first time |
 |
On the second pull through of the dc stitch,
switch to new colour |
 |
Pull through the new colour ready to
begin using it on the next stitch |
 |
Each nisse has its own character and look,
I love that, but they basically all look like this! |
Row 7: Change colour to white ch 2. 1 dc in each stitch, trap in the loose threads whilst crocheting
STUFF the nisse at this stage before we begin crocheting. I have stuffed some so they are more bulbous in shape and others are much slimmer, just to add to the variety of appearance.
Row 8: Change back to red. ch 2, then I dc in next 2 stitches . dc3tog 1 dc in the next 3 stitches dc3tog 1dc in the next 2 stitches ss to join
Row 9: ch 2 dc3tog 1dc in next 2 stitches dc3tog 1 dc in 2 stitches ss to join
Row 10: ch 2 dc in each stitch ss to join - should be 6 dc
Row 11: ch 2 3dctog 1 dc in next 2 stitches ss to join
To create the
hanging loop just chain double the length of the hang that you desire and sew in the end at the top of the nisse. Again on mine I have varied the length of each of them to add interest.
 |
| A chained hanging loop |
Finishing touches.
Eyes: these can be embroidered on, or in my case I sewed on two beads.
 |
| The eyes have it?!? |
Beard: Using white yarn and a needle with double thread, all around the flesh face parts sew lots of white loops to form a beard, see photo
 |
| To keep the beard loops the same size, I loop them around my finger |
Hat pom pom: Here I used a variety of different ideas, I used the same lop method as for the beard, some were left with no pom pom and other just lots of white strands. I am still to actually make one with a real pom pom, but I will, I promise!
 |
| To pom pom or not to pom pom, that is the question |
Once I was in the flow of making these, I changed each one slightly and depending on my mood, I may have added a second flesh colour face row, made the hat section longer, added in extra stitches around the mid riff etc. just to create variety and give the little chaps individuality. A couple were not even given beards, puberty had obviously not kicked in on them yet.
Play and have some fun! I did.
 |
| Nisse and holly work well together |
 |
| A pubescent nisse! |
 |
| Crocheted nisse (Santas) and Christmas trees, the tree post will be tomorrow |
♥ Hope the week is treating you well ♥


