• Home
  • About
    • Crochet
    • Knitting
    • Baking
    • Christmas posts
    • Sailing & Travel

      Norway and lazy days

      17th June    

      Flying into Norway, we even saw the
      little island Brimble was moored at!
      Norway, I love it. 

      For those of you who have not been, I can totally recommend it.  Whilst the weather rained in the UK every day a couple of weeks ago, Norway had the bluest of skies and warm summer breezes.  The days were noticebly longer and all felt good with the world.  If you are new to this blog, I should inform you that along with crafts,  in our household we have a passion for sailing and we sail as much as we can and take our boat to as many new and old favourite places as possible.  We use our boat well, she is our second home, she is our protection from the elements and she looks after us, Brimble is family.


      Anti fouling her bottom and polishing the propeller,
      hoping to make her speed along faster in the water
      Last summer we sailed across the north sea and took Brimble to Norway, we over wintered her in a purpose built shed, boy was she spoilt, she doesn't get treatment like that in the UK. And so, a couple of weeks ago it was time to move her out of the shed, give her her yearly bottom clean and paint, sort out a few odd jobs and begin this seasons sailing.  We are ambitious this year and aim to sail her north into the Arctic circle and sail in the midnight sun.  Norway is a country of dramatic and varied scenary. It is Mr H's intention that Brimble be photographed amoungst the majestic mountains that are Lofoton. Watch this space.

      Below, I have added a photogrpahic diary of our time in Norway, hope you enjoy!
       
      Before the first 'shake down' sail of the year, everything that had been taken off the year before had to be painstakingly put back in its correct place.  Our boat is very small and everything has to be just so!
       

       On the Sunday in the evening sun, when we were all stowed and ready to set sail the following day, we noticed a problem!  One of the shrouds holding up the mast had failed!! Nowhere was open on a Sunday and we were on a tight schedule to move the boat around the coast in order to ensure she will be in the Arctic this year.  We are flying to and fro as we need to work and have only a limited amount of holiday time!  This was potentailly disatrous on several fronts.  Have you ever been to Norway?  Do you know how expensive it is there?  Just thinking about replacing some of the rigging brought me out in a sweat, but better to have found it now I kept telling myself, than be sailing with all sails up and the rigging failing totally and the mast coming down...
      didn't bear thinking about actually.
       
       
      Norway is a large country with a small population, just shy of five million people.  You work it out, the country is twice the size of the UK and we have over thirteen million people living in London alone!  So it meant that the closest riggers to help us repair Brimble were over an hour and a half away.  This is prime boat fitting out time but we were very fortunate that we were accommodated and were only delayed by two days.  It did mean we had lots to catch up on mileage wise!  Along the way in the car, we saw many beautiful places to stop, even the main, the E18 had beautiful wild deep dark purple lupins along the grass verges.


      Below, he sail makers, where we had four new shrouds made for Brimble,
      that is our rigging on the floor there.


      As great as the riggers were, they could not come out to the boat to fix the new rigging.  So it meant Mr H and I had to do it!  What does this mean?  I had to hoist him up the mast and he had to trust me not to drop him.  That could have been interesting!  I was nervous about this, especially as the mast was only held up by fifty percent of the normal rigging and it was a little windy.  But we managed it, although I was a little naughty and when bringing him down, left him a few feet in the air for five minutes, just to see his reaction!!


      Before sailing anywhere, as with any journey, you need to know where you are, where you are going and plan your route.  Sailing makes this a little more complicated and the coast of Norway is full of rocks.  I sail with my heart in my mouth most of the time, but Mr H and the
      children seem to relish in the challenge.
       
       
      And so finally we were ready to leave our winter storage marina. 
      Thank you for looking after us, Wector Yachting.


       We are never the luckiest of fishermen, much to the delight of my daughter, who really does not like fish and to the dismay of my son, who loves fish.  But we managed to catch some young 'fat' makeral.
       
       Within ten minutes they were in the pan, fried in butter and with a good squeeze of lemon juice.  Perfect Norway summer sailing.


      Part of travelling for me is going ashore and mooching in the shops, I came across this lovely painting which we all loved and may use it as inspiration for a craft project later in the year. 
      Just love the colours.
       
       
      Meeting people alomg the way is part of travelling too and we even had Nina,
      the dog come on board and visit.
       
       
      The evening light in Norway at this time of year is just so magical,
      this was about eleven pm at the end of May.
       
       
      Sailing in Norway at the end of May this year was
      all about being woken up by blue skies every morning.


      We sailed in and out of little islands.


      Norway had a bank holiday whilst we were there, they are a very proud people and very patriotic, most have flag poles and flew there rich looking flag.
       
       
      Narrow passages need to be navigated with care.
       
       
      On deck spotting for shallows, we were mostly successful?!?!?


      Just like travelling on the front upper deck of a double decker bus, sailing under briges always makes you catch your breath.
       
       
      Can you spot the two cyclists on the bridge?  Not sure I would be comfrtable cycling there!


      You know you are beginning to age when you have more than one pair of glassess each...
       
       
      Keeping a good look out whilst sailing is imperative!
       
       
      Last year the sea was bubbling with jelly fish and we had hoped this year would be better, but the signs so far are not good.


      We really are a small boat.
       
       
      Evening skies are varied and breath taking.
       
       
      All types of boats are out on the water
       
       South Norway coastal towns are often all white houses, lovely to roam around.
       
       Brimble's last stop for this trip and what a welcoming place Lillesand was.
       
       Until we see you in a few weeks Brim, take care x
       
      In the mean time, the very lovely and attentive harbour master Finn, sent us this picture to show us Brimble is safe and sound and being looked after in our absense.  Now that is what I call service!  Thank you Finn.


Crochet colour and quick makes

16th June 

Having made a vase last week which took no time at all, very little thinking power and no money, see  here , I was keen to add to my quick make collection, add colour to our home and have something to do without taxing me as life is very busy at present.  Below is the result.  I have added a cushion to my crochet collection and made a matching tea light holder.  All made in the super quick granny stitch, see the vase post for how to  help.  I then added a scallop edge on the tea light for extra detail.  The weather has turned cold again here and so I could not photograph outside, which meant I played indoors with the cushion in various rooms and situations.  Indulge me, please!


For the cushion pattern on the right, see here


For the scallop edge, all you need to do is to slip stitch into first stitch of row below, then into each next consecutive stitch, sc, hdc, dc, trc, dc, hdc, sc, sl and repeat this until the end of your row.


The recent quick make collection!


BUT, this is what I should have been doing instead...


...off now to do paper work and admin!
 
♥Hope you all have a great week♥

Crocheted scrap busting and recycling!

10th June 

My new "free" vase

Crocheting has not been high on my list in the last few weeks, as often happens, other things have got rudely in the way and crochet is the first to be put on hold, let's not even talk about the mood blanket.  But quick makes are always at the forefront of my mind and I am often thinking how better to recycle and not make so much waste.  Our bins seem to over flow some weeks, it is embarrassing.  Plus it would be good not to spend any more money on wool, despite the urge to, so this latest idea solved many of my dilemmas in my mind. 1) it cost me nothing, but using up spare wool 2) I was able to recycle and not throw away 3) I was able to complete a very quick project and have something colourful to show for it.  So what did I make... a yogurt pot vase!


We munch our way through a lot of natural yogurt in our house, I like it mixed with crunchy muesli and fresh berries and the children enjoy it whizzed up with fruit to have a morning smoothie, with a sprinkling of flax seeds and a teaspoon of honey.  So I reckon we get through 1 or 2 large tubs a week.  That is an awful lot of plastic to throw away.  Friends of mine, watch out, this could be your next birthday present, I may just become a one woman band of creating a production line of these vases!


 So I needed said yogurt pot to measure the length needed, this time I was more accurate than last week when making my glasses case cum pencil case, see post here I chained 40 and realised when placing it around the pot, that I was way out and chained a further 30,
I used Stylecraft wool as often used by Lucy of Attic 24 and a 4mm hook. 
But this is stash busting, so you can use whatever you have.


I chose a quick stitch and used a granny stitch, whereby I chained an extra 3 at the end of my chain which counted as the first double crochet and into the fourth chain from the hook dc  and again dc into the same chain, thus meaning i had the chain 3 and 2 dc into the same chain stitch.  Next,  I chained one.  I continued along the chain making 3 dc into every fourth stitch and chaining one before moving onto the next 3 dc cluster.  On the next row I changed colour and made my 3 dc clusters in each of the chain spaces from the row before.  I continued in this manner, changing colour on every row until the crochet was the desired height of the yogurt pot. 
This works up super quick,  needs very little thinking about
and is a perfect project to complete in front of the TV!


I stitched the sides together as best as I could weaving in and out, it is easy to make this look  with a darning needle, great big eye for threading wool and it looked OK.  But on putting it on the yogurt pot I did not like the fact you could see the writing and pot design through the gaps of the crochet.  What do you think?
 
 
So out came my favourite paint, Autentico and a quick direct slap onto the pot, it was dry within 30 mins in this glorious weather and I was
able to have what I think is a great new vase! 
(I bought this paint from http://www.sarahughes.co.uk/ )


Now the identity of the pot is covered up by paint and crochet!


I enjoyed the flowers outside for the afternoon but in reality, this vase will sit in my utility room in my wool and painted furniture haven.  A colourful corner in our home.


I just love quick colourful makes, don't you!


Is it a crocheted glasses case? No!

June 2nd 

Well it is June already, phew the year is flowing along so fast and I think I am loosing my marbles... left my crocheted and well loved glasses case in Norway, see post here , so I decided before work this morning to hook up another one quickly.  There is a moral here, do not rush and measure accurately!  What did I make this morning...

 
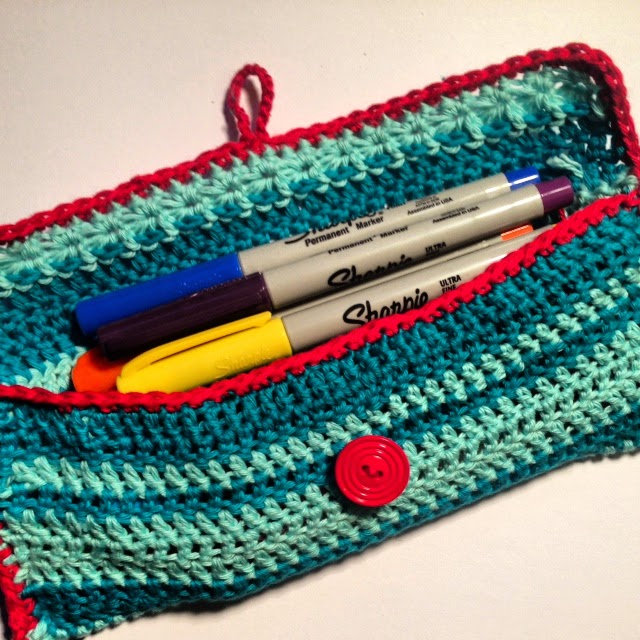
... a pencil case!
 
 
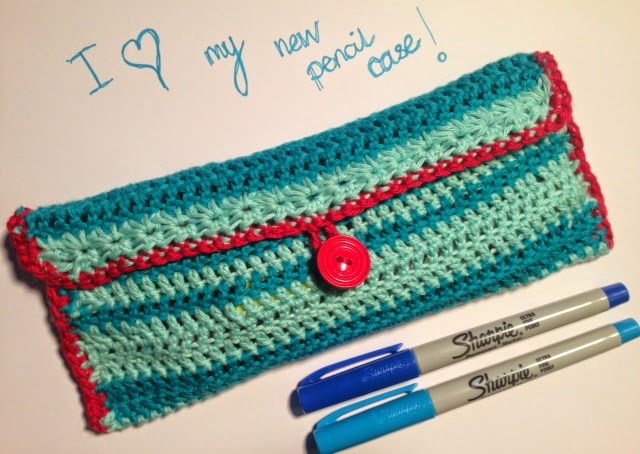
As it happens, I love it and have been wondering where to hide my lovely new Sharpie pens away from the children, once in their grubby mitts, the tips would be ruined and I would never see them again, so for now at least, they are safe in my new pencil case and I need to crack on with making a crocheted glasses case.
 
It was quick and simple to hook up, see what you think...
 
 
Crocheted glasses case/pencil case  


You will need colours of choice.  As I wanted the glasses case for today at work, I opted for a quick two colour stripey effect, unlike the more colourful case made previously, see above link.
 

Look my new double ended crochet hook!


Chain required width for pencils or glasses, underestimate the width, unlike here in the below example, where it should have been obvious, that the case would be too long! Here I chained 45, in reality I think it should have been 30.


Again, for speed, I chose to hook stitches in double crochet. Chaining two at the end of the row and crocheting the first dc into the second stitch.


Within minutes the case grew rapidly.


I continued to check for the correct length required, for the crochet to cover the front and back of the glasses and to have a flap to overlap for fastening.


Once I was happy I was almost at the required length, I decided to add some crochet detail by using star stitch for the last row.  I thought this would look good on the flap.


To make the star stitch, it is VERY IMPORTANT to begin this stitch on the right side of your crochet as the back will look very different.   Chain three.


Into the middle chain, insert hook, yarn over and pull through.


Into the first chain (bottom chain), again insert hook, yarn over and pull through. 
You should now have three loops on the hook.


Into the first stitch of this row (last stitch of the previous row) insert hook, yarn over and pull trough.  Do this for the next two stitches.  You should now have six loops on the hook. It is important to keep the tension loose and not pull tight, otherwise the rows will creep inwards.  Don't do it, I've been there with my mood blanket and it is painful. See post here.


With all six loops on hook, chain one.


This closes the star stitch.


Insert hook into the 'eye' of the star stitch, yarn over and pull through.


Look carefully and insert hook into the last 'spoke' of the star stitch, yarn over, pull through.


Into the next stitch, insert hook, yarn over and pull through, do this to the next two stitches. Again you should have six loops on the hook, yarn over and pull through all six loops, this will have created the second star.  Continue like this until the end of the row, finishing with a hdc in the last stitch.


Front view of the star stitch so far.


Back view of the star stitch so far.


To complete the star stitch you need to crochet another row, chain two and turn.  Make a hdc in the 'eye' of the star stitch.  Then in all remaining 'eyes' make 2hdc.


Once you create the row of hdc into the eyes, the star stitch really
comes into it's own and looks lovely.


Now it was time to fold over the case.  At this point, I realised three things. 
1) If I didn't hurry up, I was going to be late for work and that was not an option
 2) I felt the the colours did not give the 'zing' I desired
3) The glasses case was looking suspiciously too wide and not fit for purpose


So, in haste I decided to add a sc row around in red,
 this would serve to join the sides and to add the 'zing'.


Once the red had been crocheted all round, I folded the case width ways in half and chained a single row of 8 chains, enough to fit around a small button.


Finally I located a matching red button sewed it on and confirmed my fears, that indeed the case was too large for my glasses and I would have to now dash out of the house with my glasses on the top of my head as I did not want to risk scratching them in my bag! 
 
But instead, on arriving home this evening, I came upon a brain wave so as not to waste the mornings effort and used the case, which I rather like with the red edging to house my newly acquired set of fine nibbed Sharpie pens.


...and guess what I started hooking up tonight


... a smaller version, hopefully for my glasses this time!
 
 
Have a great first week of June everyone ♥