• Home
  • About
    • Crochet
    • Knitting
    • Baking
    • Christmas posts
    • Sailing & Travel

      Christmas light

      My first married Christmas we decided to hunker down and not spend it with family.  We did not want to begin a tradition of one year at his parents and one year at mine.  
      It was a strange yet magical Christmas, 
      Salt dough heart ornaments for the Christmas tree

      made all the more special because John sat with me to create our own ornaments for our very first Christmas tree together.  It set the tone for all the years that have followed.  

      That year, 26 Christmas' ago we made heart-shaped troll deig (salt dough) ornaments and hung them on the tree with red ribbon.  We made them with love and laughter and who knew they would last for more than ten years.  We are now on our third set of red troll deig hearts and every year as we hang them, enough to fill the tree, my heart leaps a little in joy.


      One of the many things that I love about the winter and the lead up to Christmas is all the lights, so many cultures have the same idea, light at this time of year is so important.  Adding that much-needed cheer and lightness to otherwise dark difficult and daunting months. 

      Using troll deig and inspiration from a tealight holder that we have had for many years, I decided to try my hand at 3D troll deig and see if I could recreate my own tea light cone tree.

      The tealight cone tree that gave me the inspiration


      You can clearly see the two I made but in the dim
      light of December days, I think I can get away with it

      Troll deig (salt dough)
      You will need:
      250g plain flour 
      125g salt 
      100-150ml water 
      template or design your own 
      cardstock 
      pen 
      ruler 
      knife
      small cutters or a straw
      sellotape
      white acrylic paint


      Template for cones


      For the template:
      ♥  Cut out the template for cones onto heavy-duty card stock, the large cone needs sides of 15cm and the small cone needs sides of 9cm.
      For the dough:
      ♥  Mix the flour and salt thoroughly.
      ♥  Add the water slowly until the mixture begins to form a dough and you can make it into a ball.  You do not want the dough to be too dry nor too wet, unhelpful of me I know, but it should be pliable without cracking and not sticky.   

      The salt dough needs to be pliable without
      being sticky or cracking too much

      ♥  Divide the ball into two pieces and then on a floured surface roll out one piece to about a thickness
      of 3-4 mm.
      ♥  Place the template on the dough and cut out, I used a ruler to create straight edges and a sharp knife.

      Use the template to cut our the cone shape


      ♥  Carefully cut out shapes for the light to be able to shine through, I used a very small cake decorating star cutter, but you can use a straw or cut out shapes freehand.  Remember to not cut out too many as that will reduce the stability of the 3D shape.
      ♥  Where the area is for the fold/glue line score some little marks on the salt dough to aid adhesion when forming into a 3D shape.
      ♥  Shape the template into a 3D form and secure on the fold glue line with sellotape.
      ♥  Next carefully repeat the template process with the salt dough, forming it into a 3D shape and carefully joining the seams together with a little bit of water and some gentle pressure.  The salt dough cone is fragile at this stage, so carefully place it over the 3D template and place on a baking sheet.
      ♥  Bake in the oven on the lowest setting for about 3 hours or until solid.

      Bake the salt dough on the lowest temperature
      of your oven for about 3 hours

      ♥  Once completely cooled, paint with acrylic paint, remember to NOT paint the inside!
      ♥  I have been using a real tea light inside mine but it would perhaps be safer using an electrical battery operated tea light instead.  I never leave mine unattended.

      ♥  With any spare salt dough, you can make ornaments or anything you like.  I made some star and heart cocktail stick toppers, they can be used for food or for jazzing up your house plants for Christmas!


      Add salt dough decorations to your house plants


      Homemade Fimo Nisse, salt dough
      tea light Christmas cone trees and
      plant decorations made from salt dough too

      Can you spot the shop-bought cone and
      my two homemade cones in the dining room?

      A trio of Christmas tea light tree cones

      ♥  Happy hump day to you all, 

      only 9 days till Christmas day!  ♥

Japenese flower

First attempt at a
kanzashi flower
It's been a tough year on so many levels this year, am I right?  From little almost insignificant things to life-changing, life-altering happenings.  When you talk to people almost everyone has a story to tell. And then there are some people who you watch and think wow, you really are one of the stars in this world and you do not realise it.


This said a lovely friend asked me to make her a fabric brooch in a family tartan that she wanted to wear to a special occasion.  It was an important affair and she was to be standing in front of many people and was to be watched via a live online platform too.  She asked if it could show the tartan well and be of a reasonable size but all she had was a 21 inch square of the fabric.  This was how I was introduced to the amazing world of fabric origami and the fun to make Japanese kanzashi flower.  Not heard of it, no neither had I but it is now something I shall return to again and again and would make the most amazing Christmas brooch.  In fact, I did just that...
Old cotton trousers
transformed into a
kanzashi flower


The tartan kanzashi brooch gifted to my friend
 

These kanzashi brooches were made in June


Equipment needed for
Kanzashi flower making

Kanzashi flower 

You will need:

cotton fabric measuring 21 square inch
fabric scissors or wheel cutter
tape measure
pins
sewing machine
iron
needle and thread
fabric stiffener ~ optional but recommended


Cut out seven squares of fabric with 9cm sides. Iron each one.


Fold the squares diagonally, keeping the
fabric design showing on the outside. 
Iron to create a crisp fold.


Fold the right-hand corner towards the top corner

Repeat with the left side.  


Iron to create sharp folds.


Turn the square over and fold back
each side so they meet but do not overlap

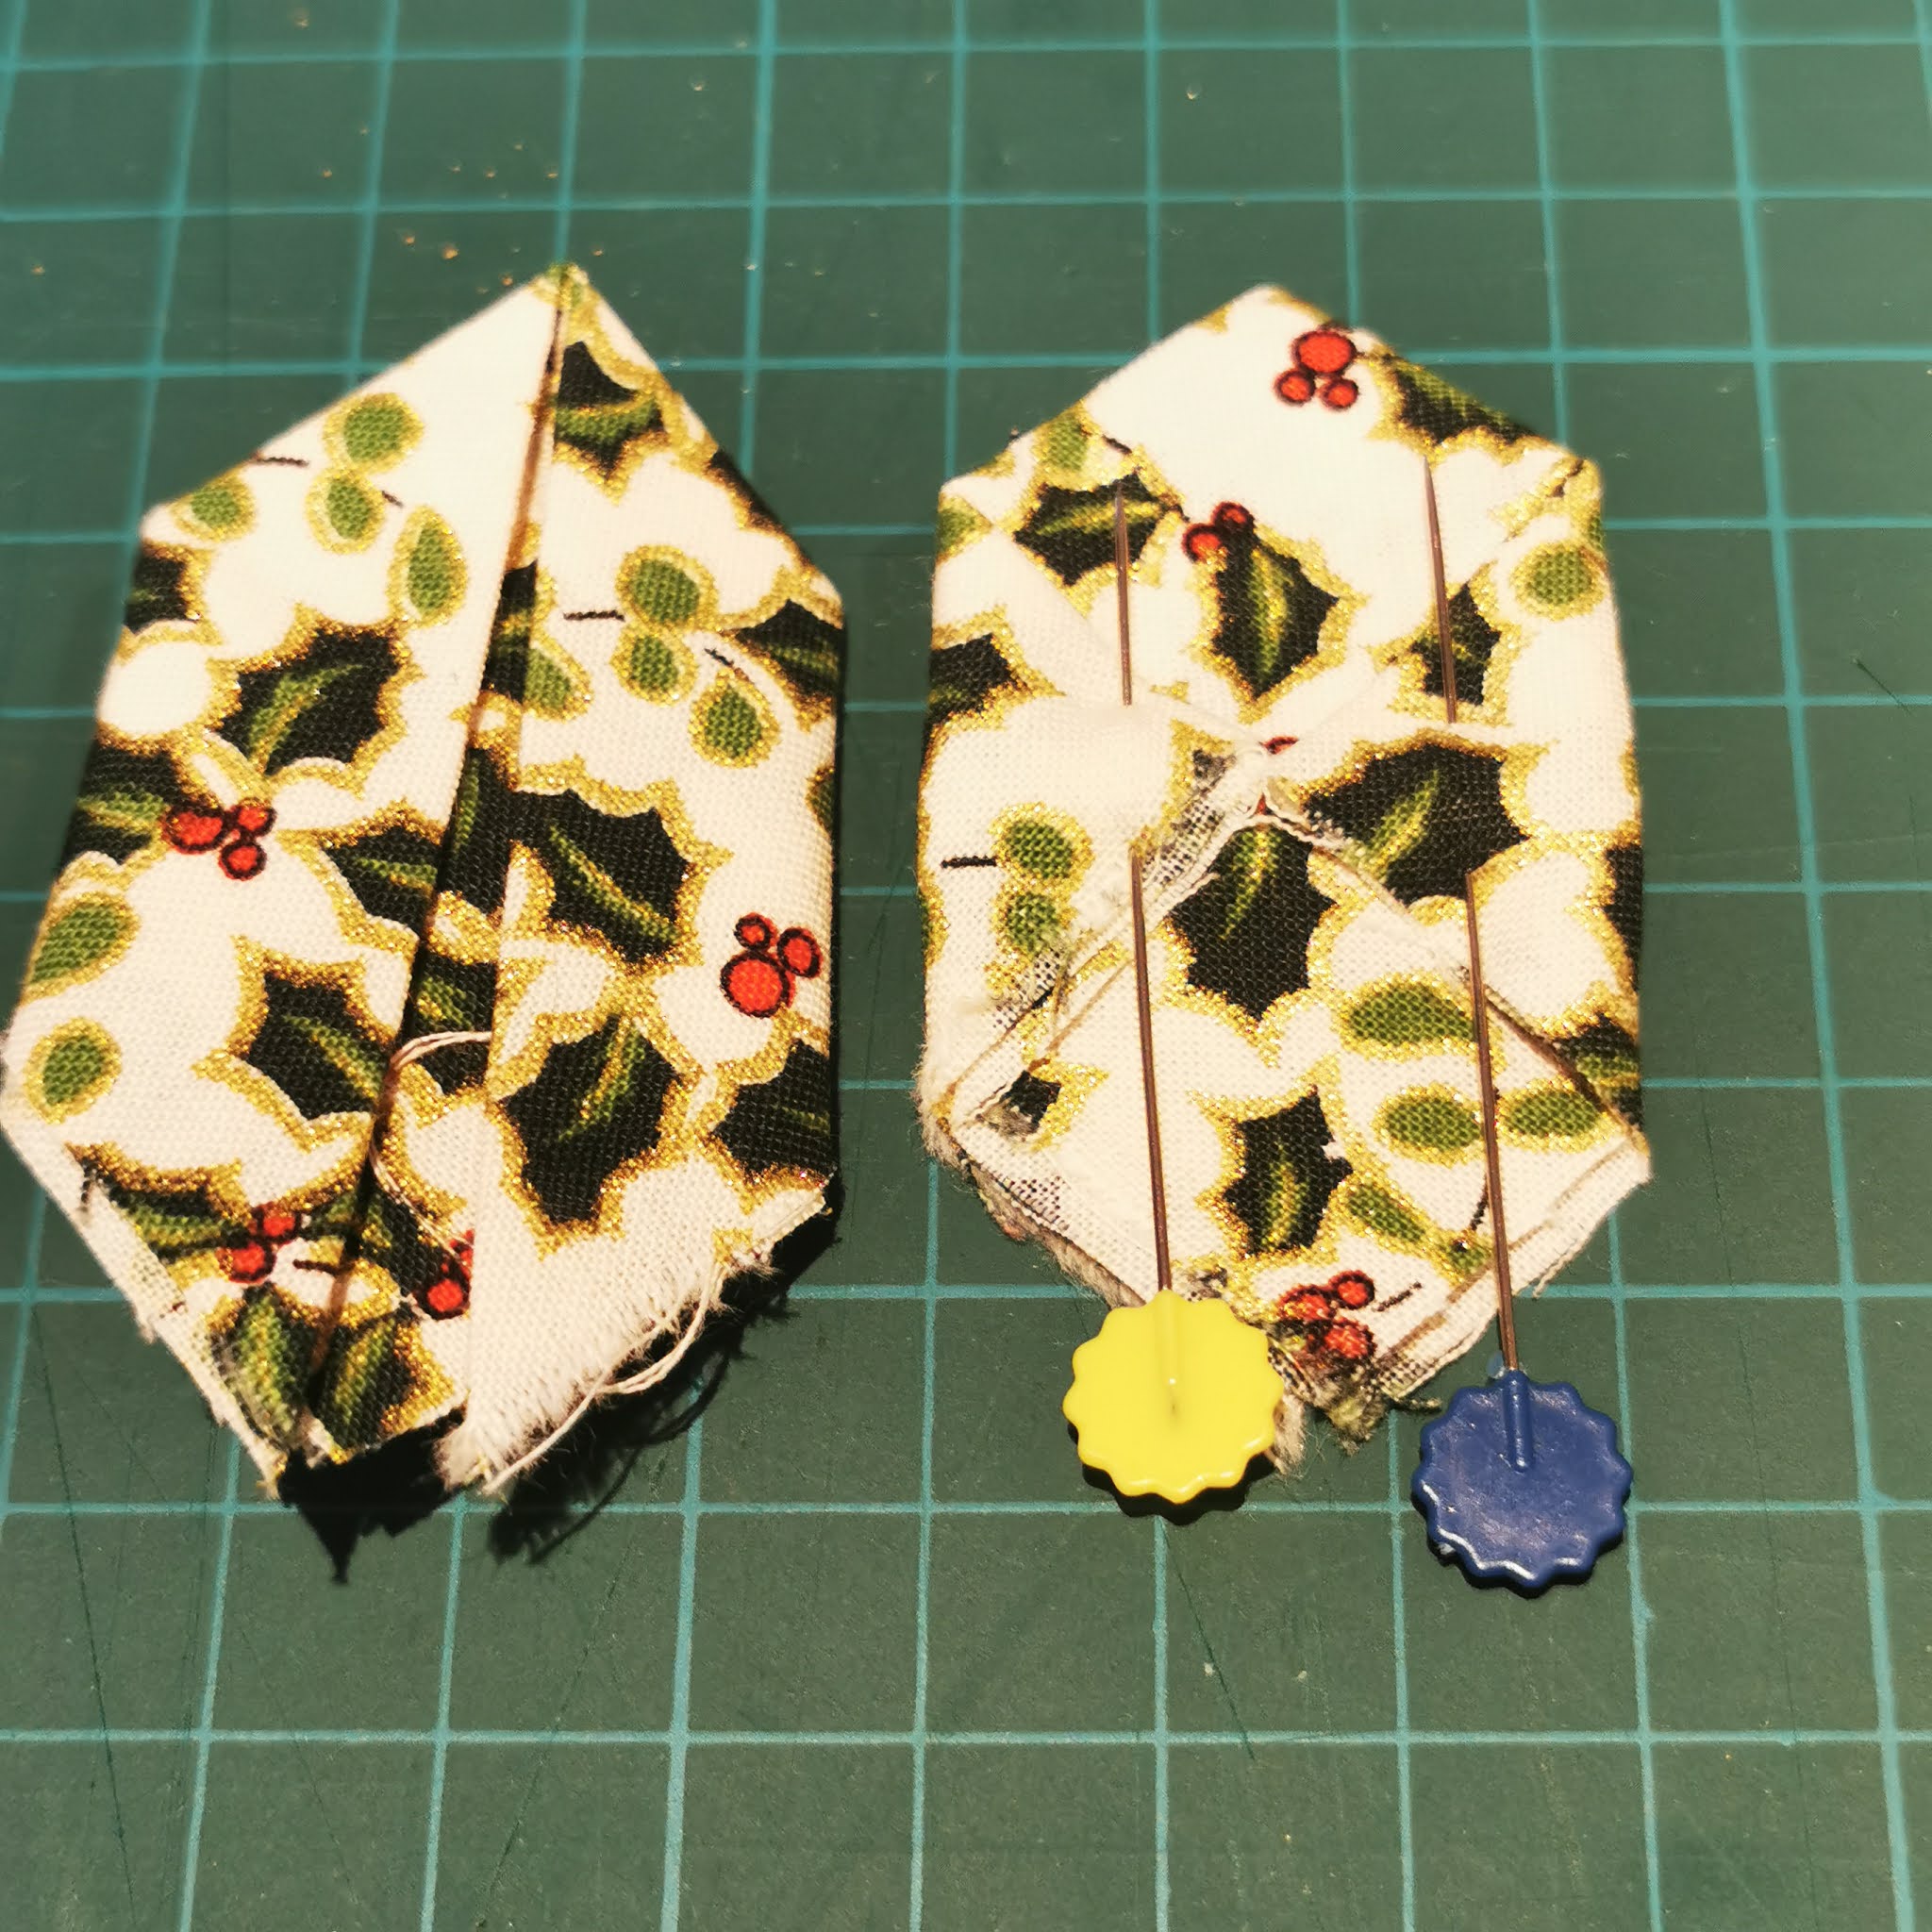
Here you see the front on the left
of the photo and the back on
the right of the photo. Hold with pins and iron.

All folded and ironed, pins removed.

Pick up the folded square and fold in
half vertically as shown in the above photograph.
This shows how the front looks.
Remember to do this for all seven.


This shows the back at this stage.

 
Hold each in place with a pin.

Snip off the end of each petal as shown above,
just taking off the slanted section.

All petals sniped.

To join the petals together take a needle and
thread and just a few millimetres up from the bottom
sew through all the layers of the petal and repeat for
each one.  Be careful
DO NOT TO PULL TIGHT at this stage.

Ensure from one white cross to the next
that you go through all the layers of fabric. 
This is the front of the brooch.


This is the back of the flower brooch.

To sew the actual petals together which binds the whole
thing, sew each edge from one petal to the
neighbour petal together, see next photograph
for further clarification.

 
Sew from one red arrow across to the next petal


Once each petal is sewn with the next,
gently pull the threads together to
form a tighter flower.  Be gentle or the thread
will snap. This is the front of the flower.


This is the back of the flower.

Here you can clearly see how the flower has been stitched together.


Once the flower petals have been pulled tight
together and you have fastened off
your thread, it is time to open out the petals. Here you
see one petal opened. It is a question of just putting your
thumbs into the petal and pushing away the edges
of the fabric to open up.  Depending on the type
of material you use will depend on how well it
will hold it's shape on its own.  It may be you need to
either spray or glue on some fabric stiffener.

A Christmas Kanzashi Flower Brooch. 
You need to sew on a brooch fastener
to the back and you are all done.

Kanszashi flower.  I left the Christmas Kanzashi brooch
like this, but if you look at the summer Kanzashi flowers I made,
I also covered a button in the same material and added it to the
centre of the flower.  Both versions work just as well.


On this thin cotton fabric, I brushed on
fabric stiffener after I had assembled the flower.

I have realised that I cannot show you the brooch being worn as both that I made for Christmas have been wrapped and gifted! But they obviously look like the summer ones above but in the holly fabric!

♥  Do you wear Christmas embellishments?  ♥


Table setting and place names

Many years ago, my cousin asked me to write the place names for her wedding, I think there were about 150 guests but I could be wrong, there was a lot I know that.  I agreed of course and the next thing I knew many many stones were delivered to my door.  I still have mine and John's and they live on the front porch.


Our place name stones are hidden at the base
of the silver birch Nisse

This led me to think about Christmas place names this year and how could I put a Scandinavian spin on Emma's wedding place names and of course it was simple, I needed some Nisse*.  


Our Christmas place names

To make the Nisse I bought Fimo clay in red, white, black and pale orange. 

I created two types of Nisse with slight variations on each. One had legs and the other just a body. Some had large noses with a hat others also included a beard. And some just a hat with no face.  It was fun creating the little figures. And really rather quick.  Below is a rough guide to how I made them but I'm not the most artistic, I'm sure you could come up with much better versions than mine. Once all were made I placed them on lined baking trays and baked them in a cool oven at about 140 degrees Celsius for about half an hour. I left them a day and then super glued them onto the cleaned stones that I dug up from the garden. 

Nisse made from Fimo as
place names for the Christmas table

I also made some spare Nisse which I did not attach to stones but will dot around the house. In hindsight, I would have made a small hole through the Nisse hat and then I could have used them either as hanging ornaments or to decorate gifts with. I think that would have been superb. Next year... 

A room full of Nisse


Nisse with a body, beard, nose and hat

Frustratingly I have lost the photographs I took at each stage of the process, so apologies as my notes will have to suffice.  these Nisse are not hard...

To make the Nisse:

For the body with just legs:
Take a small ball of black Fimo and make into a sausage shape and then bend it in half, do not crack the Fimo so just give it a bend, so it will sit neatly under a hat.

For the body with no legs:
Take a small ball of black Fimo and make the body into a cylindrical shape. 


Nisse with legs and a hat


For the hats:
I took a small ball of red and began to shape it into a cone shape.  I place my thumb under the base of the cone where a head would sit and push my thumb up into the base to create a little indent, this seemed to give the hat a bit more of a better shape.  I then manipulated the hat to whatever fashion I fancied.

For the beard:
Take a tiny piece of white Fimo and make it into a flat rectangular shape, cut out a shallow V shape
Make the beard marks with the end of a toothpick

from the top of the rectangle, this would allow for the nose to be! Once you have gently placed it onto the Nisse body take a toothpick and scratch some beard marks onto it.

For the nose:
Using a small piece of the pale orange, shape into a ball and attach.

Using a combination of the above, you can create your own family of Nisse.  If I find my instructions photos I will edit and add them in, it is so annoying!

Once you have baked them for 30 minutes in a cool oven and they have cooled completely, I super glued them onto the stones and then used chalk markers to write names on.  For Emma's wedding, I used permanent white markers but for my place names, I have used washable markers, so they can be used again and again. 


Nisse both on stones and stand-alone

♥How will you set your table this year?♥


Chessboard Cookies

Today's cookies are considered by many families in Norway to be one of the essential 7 types of cookies

Checkerboard Cookies ~
Sjakkruter
to bake for Christmas list.  In comparison to other cookies the Scandinavians love, these are relatively bland in flavour as there are no spices. Don't however be fooled, the combination of vanilla and chocolate in these chess-like cookies are a perfect match.


Chessboard Cookies ~ Sjakkruter 

You will need:


You should have 2 vanilla
balls and 2 cocoa balls

300g plain flour 
75g icing sugar
200g butter, room temperature 
2 tsp vanilla sugar
2tbsp good quality cocoa powder 


Mix the flour and the icing sugar thoroughly. 
 
Add the butter and mix till it forms a smooth dough. 

Vanilla and cocoa rolls,
placed next to each other
Divide the dough into two portions. Adding the vanilla sugar to one and the cocoa powder to the other. Make sure each is incorporated well. 

Next, divide each portion in half so you now have two vanilla dough pieces and two cocoa. 

Roll out one of the vanilla pieces into a long sausage that measures about 60cm.  Repeat for one of the cocoa pieces. 

Place the cocoa roll next to the vanilla one.  Cut the rolls in half at the 30cm mark. Carefully pick up one set of vanilla and cocoa rolls and place them on top of the other so that the vanilla sits on the cocoa and the cocoa sits on top of the vanilla, in a checkerboard way. See photograph.
Press gently down. 
Checkerboard rolls


Repeat the process again with the remaining two dough balls to create another set of checkerboard rolls.

Place both checkerboard rolls in the fridge for a minimum of half an hour. 

Preheat the oven to 175 degrees Celsius. 


Checkerboard slices
Take the rolls out of the fridge and slice each one into slices about 6-7mm thick. 

Place slices on lined baking trays, leaving room for them to expand a little. 

Bake for 10 minutes. 

Let them cool on the trays for a couple of minutes before transferring to a cooling rack. 


Here we see the difference between prebaked and baked


A tin full of Checkerboard Cookies

Today in Scandinavia it is St Lucia's Day when tradition is to bake saffron buns. I write and share the recipe each year so follow the link  here to learn more. 

♥  We have now made five of the seven cookies for Christmas, hope you have a good Sunday everyone and preparations are going well  ♥